For the better part of 30 years I made my own bread. I did mostly whole wheats and ryes and did sourdough versions of both. During the last 10 years of that time, I got myself a good quality mixer so I was no longer kneading by hand. Then about five years ago I stopped making it even with the mixer as I was, quite simply, tired of the work.
I still reminisce about the day, some 18 years ago, we ended up with a high school exchange student from Uzbekistan. He had come to Carson to live with another family and it had not worked out. He was one of Mark's students; he came to Mark quite distraught thinking that he would be forced to return home after his family had sacrificed a good deal to get him here for the year. So with little thought, we welcomed him into our home and had an instant high schooler living under our roof.
At our very first meal when I served up some fresh bread Artyem literally flipped! He went on and on about how he had missed the bread so much from home and how delicious my bread tasted. It, of course, wholly cemented our new found friendship.
Homemade bread cannot really be matched in my book. So, after a number of years of going without I began a new journey making "artisan" bread. I purchased a cookbook that promised all kinds of breads with no kneading and that took only a few minutes each baking day.
After several years of doing this artisan bread I can state, without question, that this is the only way to make homemade bread! It is not only easy and extremely flexible, but it is absolutely superior to any other bread I have ever made.
Artisan bread is mixed together in a container (no kneading – just mixing). Allowed to sit and rise for several hours and then refrigerated for future use. The beauty is that you simply pull out a ball when you wish to make a loaf, allow it to rise and bake it up. The remaining dough is returned to the refrigerator for future use. When you mix the next batch, you have the option of adding the ingredients to the container without washing it — which, over time, creates a delicious sourdough version of your favorite breads.
I will provide a master recipe of white bread — but will also give you several substitutions for a light wheat and rye version as well. Please remember the most important aspect to making this bread is do not sweat the small stuff! The beauty of this process is it is extremely forgiving and flexible!
*Master Recipe:
3 cups lukewarm water
1 tablespoons yeast
1-1.5 tablespoons of salt
6.5 cups of flour
Mix all ingredients in a plastic container with a loose-fitting lid. Place in a warm spot for several hours until it has doubled in size. You may pull out dough at this time if you like and make a loaf or you can put in the refrigerator and make bread over the next several weeks. If you choose to make it right away - it may be a little sticky to work with - so just use a bit of flour!
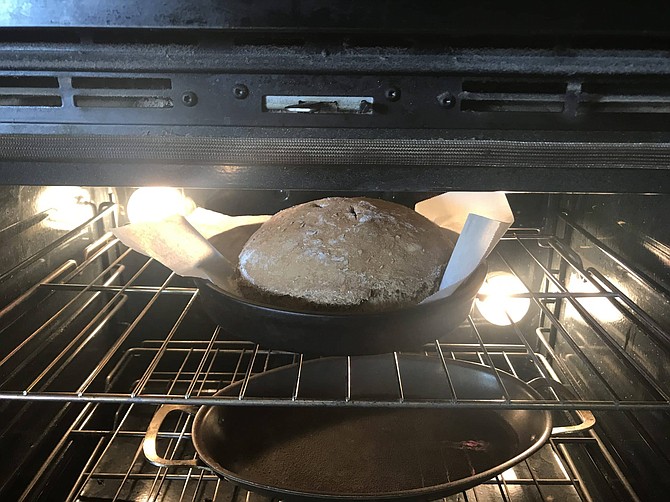
On baking day pull your container out, grab a 1-2 pound ball of dough and dust with flour if it is sticky. You can make this loaf into any shape you wish! A round artisan loaf requires folding edges under while turning in a circle a few times. You can pat it out in a rectangle and roll it up and bake in a loaf pan or make the rectangle long and roll up a baguette. Some people use a baking peel with cornmeal to rise the loaf - I place the loaf on a piece of parchment paper with corn meal spread out. Allow the loaf to rise for 40-90 minutes depending upon the warmth of your home (about double in size). Slash the top a few times with a sharp knife and bake on a prepared baking sheet.
Prepare your oven and baking sheet as follows. Heat a cookie sheet, bread pan or baking stone with another pan below in the oven at 450 degrees for 20-30 minutes. When you are ready to bake your bread place a cup or so of water into the pan below and place your bread on the baking sheet. Again - some people use a peel and they simply slide it onto the baking sheet or stone. I just transfer the bread onto the stone and leave it on the parchment paper when baking. You will bake the bread for 30-35 minutes until the internal temperature is 200 degrees with an instant read thermometer (add 5 minutes baking time each time it comes out short).
Remove the bread and place on a cooling rack. Throw out the parchment and rinse off your baking stone. DONE! You can cool, slice and freeze for future use - or slice right away and slather with butter.
*Light Wheat: Substitute 1 cup of wheat flour for 1 of the cups of white.
*Rye: Substitute 1 cup of rye flour for 1 cup of white and add 1 Tbs of caraway seed (also lightly brush with water and sprinkle with caraway seeds before baking).
Can you use this for pizza? Yep!
Can you add olives and garlic to the bread? Yes!
Can you just take it out and make some flat bread on a hot cast iron griddle without even raising it? You bet!
I highly recommend the following book from which I got my recipes. It is LOADED with other options, additions and recipes. If, however, you are into simplicity — the recipes above will serve you well. Enjoy!
“The New Artisan Bread in Five Minutes a Day” cookbook by Jeff Hertzberg, M.D. and Zoe Francois.
Kate Johnson is a long-time resident of Carson City. She practices pharmacy locally at Costco Pharmacy and is an avid gardener, cook and lover of dogs.

Comments
Use the comment form below to begin a discussion about this content.
Sign in to comment